October 23rd Update

Bit of a different update this week, my first batch of extras:

This slideshow requires JavaScript.

I’m pretty happy with how different a simple palette swap make them, The Otherkin in the story are similar to the faunus in Rwby, in that the have at least one animal trait, but unlike Rwby, I’m planning on having the animal trait be varying in how predominant it will be from person to person, these three look pretty human, I’m going to try have the next batch look a little less human. But I’m happy with the speed I got these done, I should be able to mill though these in less time than i thought.

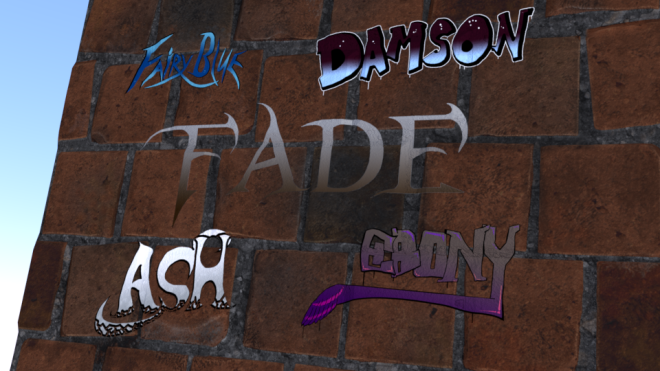
In 3D news, I’ve figured out how to make the graffiti! I won’t bore you with the technical details, but basically the Problem was That I was mixing shaders, rather then the image colours, here’s the finished result:
graffiti2

It doesn’t look like much, but this opens up a world of options for me to help set scenes, Dirt, signs, moss, even blood smears, I don’t have to make custom textures every time I want to have an interesting wall, so I’m pretty pleased with this development.

That’s all for this week, till then.

Marc Out ~~

Naga and 3D updates

Another week another Character concept, this week is Naga:
Naga

Like the other characters I’ve shown he’s based off of a two Mekakucity Actor’s characters, this time its Seto and Shintaro

10274269d1b03d4a3ef801c12bae6c2934b260bc

I disliked Seto over all design but liked the colour scheme, so I worked to stick the colours onto a design that I liked, and I loved the dual coloured jacket that Shintaro has in this picture, which he never wore in the anime, for some strange reason, because I think its the best outfit I’ve seen him in.

In 3D news I’ve been taking a break from my female template to work on two new things: A male template and fixing the transparency problem with my title wall.

I’ll start with the template model, since I’ll get though that quickly. I was attempting to do what I had done with the female model and use a Rwby reference image, and I thought that using mercury would leave little up to imagination but I’ve realised that most of the guys in Rwby have some form of popped collar and waist obscuring drapery, making is difficult to gauge parts of the body, also male eyes are much smaller in Rwby for some reason. Luckily I’ve been able to find a super high res image of Neptune which has been doing the job nicely for now:
MaleTemplate1

The female template I had nearly finished when I started this blog, so I’m looking forward to showing my progress as I go with this one. Also If your curious about the reference image, check it out here:
Neptune-turnaround.png

In an earlier blog post Ebony and Material practise I talked about a problem I’ve been dealing with with some of my textures in blender cycles being unnesssarily transparent, I haven’t fully nailed down the problem, but I think it could be in how I’m exporting the images from photoshop, I decided to split my materials apart, making just a graffiti Material:

Graffiti1

And and Wall Material

Wall1

Now it looks to me that the graffiti is still a bit darker than it should be, I went out of my way to make the images bright:

I’m thinking that its possible by making the images .png files its automatically making the image transparent. If there are any experts in blender I’d love to know how you’d handle it in the comments below.

And also in case your wondering, I’ve made this graffiti for the intro of the show, Its going to be very inspired by the Noragmai opening, but more on that closer to when I’m ready to animate it.

Till Next week

Marc Out~~
Ebony and Material practise

As promised, here is our second Heroine Ebony:

Ebony

This won’t be the first piece of concept art I’ll be posting of Ebony here, she goes through a  few wardrobe changes over the course of the first season, plus there are a number of details that I left out since this was only my second attempt at concept art. Over all Character wise Ebony is my favourite so far writing wise, she’s the most flawed character and has a couple of layers that I can’t wait to explore and explain, and internal difficulties that I can’t wait to see her overcome!

Secondly I’ve been teaching myself 3D modelling for a little while now and I’ve been experimenting with Physically based rendering, the end series is going to be modelled in 3D, a little bit like Rwby, but I want to give it a bit more of a Disney pixar look, so getting these materials right is kind of key, but I hit a major breakthrough today:

HeaderArt2

I’ll admit, the title looks a bit off now (which is why I’m not changing the site’s header image, but the wall itself looks much better than the rendered image in my first post below.

Unfortunately I’m still having trouble with the image being transparent in weird ways, the actual title should look like this:
FadeTitle

Notice how it should be getting darker at the bottom instead of fading out? I’ve tried using Alpha channels but it just turns the brick invisible, and Blender cycles doesn’t seem to like overlaying separate materials, so for now its baffling me.
Luckily I’ve been accepted into an animation course that will with any luck teach me to use Maya, which I’ve heard is actually a little better in the material department.

I’ll be sure to keep you guys posted in the future and who knows, if I figure it out I might do a tutorial video on it.
Tune in next week for more Concept art and updates

Marc Out~~