Naga and 3D updates

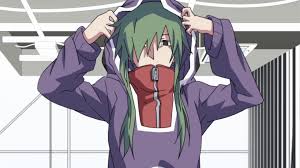
Another week another Character concept, this week is Naga:
Naga

Like the other characters I’ve shown he’s based off of a two Mekakucity Actor’s characters, this time its Seto and Shintaro

10274269d1b03d4a3ef801c12bae6c2934b260bc

I disliked Seto over all design but liked the colour scheme, so I worked to stick the colours onto a design that I liked, and I loved the dual coloured jacket that Shintaro has in this picture, which he never wore in the anime, for some strange reason, because I think its the best outfit I’ve seen him in.

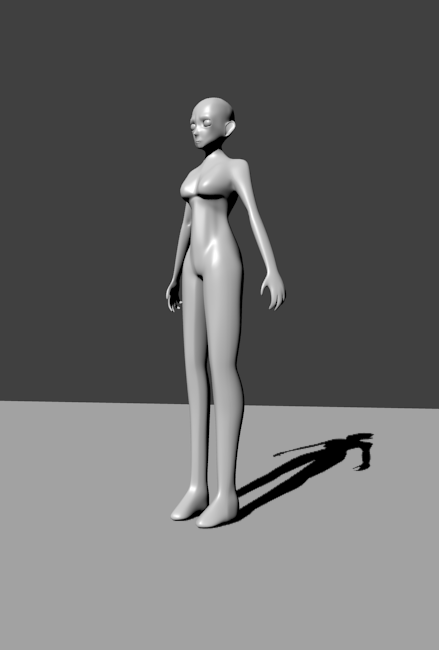
In 3D news I’ve been taking a break from my female template to work on two new things: A male template and fixing the transparency problem with my title wall.

I’ll start with the template model, since I’ll get though that quickly. I was attempting to do what I had done with the female model and use a Rwby reference image, and I thought that using mercury would leave little up to imagination but I’ve realised that most of the guys in Rwby have some form of popped collar and waist obscuring drapery, making is difficult to gauge parts of the body, also male eyes are much smaller in Rwby for some reason. Luckily I’ve been able to find a super high res image of Neptune which has been doing the job nicely for now:
MaleTemplate1

The female template I had nearly finished when I started this blog, so I’m looking forward to showing my progress as I go with this one. Also If your curious about the reference image, check it out here:
Neptune-turnaround.png

In an earlier blog post Ebony and Material practise I talked about a problem I’ve been dealing with with some of my textures in blender cycles being unnesssarily transparent, I haven’t fully nailed down the problem, but I think it could be in how I’m exporting the images from photoshop, I decided to split my materials apart, making just a graffiti Material:

Graffiti1

And and Wall Material

Wall1

Now it looks to me that the graffiti is still a bit darker than it should be, I went out of my way to make the images bright:

I’m thinking that its possible by making the images .png files its automatically making the image transparent. If there are any experts in blender I’d love to know how you’d handle it in the comments below.

And also in case your wondering, I’ve made this graffiti for the intro of the show, Its going to be very inspired by the Noragmai opening, but more on that closer to when I’m ready to animate it.

Till Next week

Marc Out~~

Yilan and General updates

This update came very close to being late, some non-Fade related stuff took up a lot of my week, but I do have stuff to talk about, the First of which is this week’s concept art, the Blindfold Code member Yilan:

Yilan

She was one of the first characters I had an idea for she’s based off of Kido from Mekakucity Actors, but also the female inklings from splatoon.

KidoHoodb37f7063329cffc2e09a6ea75d2e81f4

I love the Inkling designs in particular, I’m thinking of using some as influences in some of the character’s casual clothes at some point down the line.

I’ve also finished modelling the template model for girls, the differences are subtle, but I’m largely happy with it now:

FemaleTemplate3

The next step is to get it ready for UV mapping and setting up a bone structure for rigging, but that may have to wait until I know how to do more of that in blender

In more personally news, I’ve been dealing with signing up to a college course and obtaining funding for said course, normally I’d keep stuff like this out of this blog, since I only want to use it for Fade stuff, but its relevant because its an animation course. Which is very relevant to Fade. I’m hoping I can use this course to make the Fade Pilot episode for my final project. But this is also a warning that the schedule of this blog my change come September, but for now I’ll still keep working away getting as much ground work done until then.

So tune in next week for more concept art and more updates

Marc Out~~

Pamu and RWBY Templates

This Week’s concept art is Pamu

Pamu

who was heavily inspired by Ene From Mekakucity Actors

5mbezsh

I always liked the contrast between the black and blue in her outfit, but I never liked the baggy arms of her jacket, so I worked to make the outfit more practical and villain worthy, focusing more on the Black, design wise this is my favourite Blindfold Code design.

I’ve also been experimenting with WordPress and trying to format my posts in more appealing ways hence why Pamu here is the featured Image. we’ll see how it goes for now but if I’m not happy with it I’ll switch to another format

In other News I’ve been very aware of the amount of 3D modelling I’ve got to do for this project, so while I have still been refining my template model, I’ve also been looking for external models that I can use for extras and stand in, ideal I’d like to use Rwby models, because the aesthetic style is going to be similar . So I found some Miku Miku Dance models and ported them into blender:

WeissJaune

Honestly I was hoping they would be useful for template models, but the structure of the models is unnecessarily complex, while the textures are lacking in the detail I’m looking for, so I may have to scrap them, but I’m holding on to them for now, they may still have a use I haven’t seen yet.

As for the template I’ve been making its very nearly at the stage were I can texture it:

FemaleTemplate2

I’m more or less happy with the over all body now, its just the face and the hands that bother me, she looks a little too gaunt in her cheeks and her hand are still a bit deformed, but hopefully in the next few weeks I’ll be able to fix that and start texturing, which I’m really looking forward to experimenting on!

That’s all for this week

Marc Out ~~


Hebi and early buildings

Here we have our first villain, The Leader of the Blindfold Code, Hebi:

Hebi

Most of the Blindfold code are based off of the characters from an anime called Mekakucity actors,I love the urban counter culture vibe from the show, but I felt it fell very short with the story, it couldn’t decide if it wanted to be a mystery story of a character driven one, and with only 12 episodes to detail nine characters, it didn’t really have the time to try do both. That being said, each character is vibrant and stands out so I decided to combined and altered to a few be unique, Hebi here is based off of Marry and Kido.

Marryfront-sittingKidoHood

Actually a lot of the female characters have attributes taken from Kido, who has to be my favourite character design! In an medium that seems to love showing off skin, Kido seems to be the opposite, covering up as much as she can, which always gave he an air of mystery to me, and that is what I want to convey with the blindfold code.

On the 3D front I’ve been placing some basic shapes for buildings

city2

I think it shows the scale of the city a bit better, I’ve colour coded them for easy identification, the Green buildings are the Human Military, the grey skyscrapers are the human business sector, the blue is the government sector, the red is the research sector and the cyan tower is something I’m keeping under wraps for now, but I will say its an important location. At the moment the only area that’s dense enough is the Business Sector, but I’m hoping that over time I’m going to build up each area to a similar level, then I can work on concepts for the different sectors.

Hopefully that will tide you guys over until next week.

Marc Out~~

Damson and the city

I present the fourth and final member of Team Fade, Damson:
Damson

I feel like his design is the least solid out of the four, and that’s mainly because his colour scheme is a lot more varied, I was going for a fire and ice theme with him, actually suggestions on how to improve him would be really welcomed. He’s largely the comic relief of the group, so a more high energy dress sense might be in order? Although I might be mistaken and he will possibly  look great when I model him in 3D. Who Knows?

Speaking of 3D, I have another in progress piece, I’ve taken a break from last week’s template model to start building the city will be set in:
city1

It’s a bit bare I know, but I realised that doing concept art for the city itself is going to be very, very time consuming, so I’m taking a shortcut, I’m going to partially model the city, with basic blocks for the buildings and draw over renders of it in photoshop, it’ll save me having to fool around with perspective and angles.
So far each walled section there is named and has a function within the city, but the city itself has no name yet, back when Fade was a Rwby story, it was going to be Vacuo, but as I’ve developed the story I’ve decided that I want it to have it’s own name and identity. Maybe as I get closer to producing the finished episodes, and if enough of you guys follow this Blog, I’ll hold a naming competition, but that’s a future topic. 😀

Anyway, I’m excited for next week, because I’ll be moving onto the concept art for the villains of our story: The Blindfold Code!

See you all then

Marc Out ~~

Ash and model template

Next up is our first Male main character Ash Snow:
Ash

He’s based partially off the Original Greed from full metal alchemist and a white haired character from a piece of art I with I could find again,  but overall I like the simplicity of his costume, I was tempted to use Inuyasha as a another reference, since they both have wolf like features, but it decided against it, mainly because a few characters draw from historical japanese designs and I want Team Fade to have a more urban, modern day look.

On the 3D side I’ve nearly finished the template I’m going to work off of for the female characters:
FemaleTemplate1

Looks kinda like an Alien, doesn’t she? It still has a bit of work to do, her hips are a bit pointed, her fingers need to be a bit thinner, I’m not sure how to approach modelling her eyes and teeth and I think she could impale someone on her chest, but for a first attempt I’m very pleased with how its going, I can’t wait to try out some of the Photo realistic textures I’ve found for her.

I’m working off of Some Rwby references I found online Here, in particular Pyrrha Nikos and Mercury Black, although the images I’m using are just that little too low resolution to make out some of the finer details like the fingers. but that’s something I can figure out with trial and error.
One of the things I’ve learned doing this is how much planning you have to do as your modelling I started at the head and worked my way down drawing outlines around the profile of my reference image but often the vertexes wouldn’t match up and I’d have weird angles when I attempted to smooth the surface.

Finally I’ve been working with a friend to look over the script of the first season, its going well, but there are one or two changes he’s suggesting that could be a lot of work to fit in. I’ve never really had to rewrite any of my stories before, so its both slow going and intimidating, but I am determined to give each change the time and attention it needs to do it right!

That’s all for now, see you next week for some more concept art!
Marc Out ~~

Ebony and Material practise

As promised, here is our second Heroine Ebony:

Ebony

This won’t be the first piece of concept art I’ll be posting of Ebony here, she goes through a  few wardrobe changes over the course of the first season, plus there are a number of details that I left out since this was only my second attempt at concept art. Over all Character wise Ebony is my favourite so far writing wise, she’s the most flawed character and has a couple of layers that I can’t wait to explore and explain, and internal difficulties that I can’t wait to see her overcome!

Secondly I’ve been teaching myself 3D modelling for a little while now and I’ve been experimenting with Physically based rendering, the end series is going to be modelled in 3D, a little bit like Rwby, but I want to give it a bit more of a Disney pixar look, so getting these materials right is kind of key, but I hit a major breakthrough today:

HeaderArt2

I’ll admit, the title looks a bit off now (which is why I’m not changing the site’s header image, but the wall itself looks much better than the rendered image in my first post below.

Unfortunately I’m still having trouble with the image being transparent in weird ways, the actual title should look like this:
FadeTitle

Notice how it should be getting darker at the bottom instead of fading out? I’ve tried using Alpha channels but it just turns the brick invisible, and Blender cycles doesn’t seem to like overlaying separate materials, so for now its baffling me.
Luckily I’ve been accepted into an animation course that will with any luck teach me to use Maya, which I’ve heard is actually a little better in the material department.

I’ll be sure to keep you guys posted in the future and who knows, if I figure it out I might do a tutorial video on it.
Tune in next week for more Concept art and updates

Marc Out~~